ICT HTF Candles [Source Code] (fadi)Plotting a configurable higher timeframe on current chart's timeframe helps visualize price movement without changing timeframes. It also plots FVG and Volume Imbalance on the higher timeframe for easier visualization.
With ICT concepts, we usually wait for HTF break of structure and then find an entry on a lower timeframe. With this indicator, we can set it to the HTF and watch the develop of price action until the break of structure happens. We can then take an entry on the current timeframe.
Settings
HTF Higher timeframe to plot
Number of candles to display The number of higher timeframe candles to display to the right of current price action
Body/Border/Wick The candle colors for the body, border, and wick
Padding from current candles The distance from current timeframe's candles
Space between candles Increase / decrease the candle spacing
Candle width The size of the candles
Imbalance
Fair Value Gap Show / Hide FVG on the higher timeframe
Volume Imbalance Show / Hide Volume Imbalance on the higher timeframe
Trace
Trace lines Extend the OHLC lines of the higher timeframe and the source of each
Label Show/Hide the price levels of the OHLC
ابحث في النصوص البرمجية عن "fvg"

Liquidity Levels/Voids (VP) [LuxAlgo]The Liquidity Levels/Voids (VP) is a script designed to detect liquidity voids & levels by measuring traded volume at all price levels on the market between two swing points and highlighting the distribution of the liquidity voids & levels at specific price levels.
🔶 USAGE
Liquidity is a fundamental market force that shapes the trajectory of assets.
The creation of a liquidity level comes as a result of an initial imbalance of supply/demand, which forms what we know as a swing high or swing low. As more players take positions in the market, these are levels that market participants will use as a historical reference to place their stops. When the levels are then re-tested, a decision will be made. The binary outcome here can be a breakout of the level or a reversal back to the mean.
Liquidity voids are sudden price changes that occur in the market when the price jumps from one level to another with little trading activity (low volume), creating an imbalance in price. The price tends to fill or retest the liquidity voids area, and traders understand at which price level institutional players have been active.
Liquidity voids are a valuable concept in trading, as they provide insights about where many orders were injected, creating this inefficiency in the market. The price tends to restore the balance.
🔶 SETTINGS
The script takes into account user-defined parameters and detects the liquidity voids based on them, where detailed usage for each user-defined input parameter in indicator settings is provided with the related input's tooltip.
🔹 Liquidity Levels / Voids
Liquidity Levels/Voids: Color customization option for Unfilled Liquidity Levels/Voids.
Detection Length: Lookback period used for the calculation of Swing Levels.
Threshold %: Threshold used for the calculation of the Liquidity Levels & Voids.
Sensitivity: Adjusts the number of levels between two swing points, as a result, the height of a level is determined, and then based on the above-given threshold the level is checked if it matches the liquidity level/void conditions.
Filled Liquidity Levels/Voids: Toggles the visibility of the Filled Liquidity Levels/Voids and color customization option for Filled Liquidity Levels/Voids.
🔹 Other Features
Swing Highs/Lows: Toggles the visibility of the Swing Levels, where tooltips present statistical information, such as price, price change, and cumulative volume between the two swing levels detected based on the detection length specified above, Coloring options to customize swing low and swing high label colors, and Size option to adjust the size of the labels.
🔹 Display Options
Mode: Controls the lookback length of detection and visualization.
# Bars: Lookback length customization, in case Mode is set to Present.
🔶 RELATED SCRIPTS
Liquidity-Voids-FVG
Buyside-Sellside-Liquidity
Swing-Volume-Profiles

KeitoFX Dynamic Indicator Free vers.This script represents a versatile dynamic indicator called "KeitoFX Dynamic Indicator Free version." It is developed by the author "KeitoFX" and operates as a custom indicator overlaying on financial charts. The indicator utilizes a unique algorithm to dynamically identify bullish and bearish candlestick patterns with specific criteria.
Key Features:
- The indicator visually marks bullish and bearish candlestick patterns using triangle shapes, providing quick visual cues to traders.
- Bullish patterns are detected when the closing price is higher than the opening price and the high and low prices of the candlestick form a narrow range.
- Bearish patterns are identified when the closing price is lower than the opening price, and the high and low prices also form a narrow range.
The indicator incorporates flexible settings that users can customize to fit their trading preferences:
- Users can choose the table's placement, either at the "Top Right," "Middle Right," or "Bottom Right" of the chart.
- Customizable dimensions for the width and height of the table are available.
- Adjustable text size settings ranging from "Auto" to "Huge" are provided for the displayed text.
- A descriptive table containing trading rules and conditions is optionally displayed below the price chart.
Additional Information:
- The indicator's color scheme is harmonious, with shades of purple and neutral tones.
- The "Require FVG" setting influences the pattern detection's sensitivity.
- A dynamic standard deviation is calculated based on the selected displacement settings and historical candle ranges.
- A "FVG" condition enhances pattern accuracy.
- Bullish and bearish pattern detection includes overlapping with other predefined arrays to increase pattern significance.
Note:
This indicator is provided under the Mozilla Public License 2.0, as indicated by the source code comment at the beginning of the script. Users are encouraged to review and comply with the license terms when using this indicator in their trading activities.

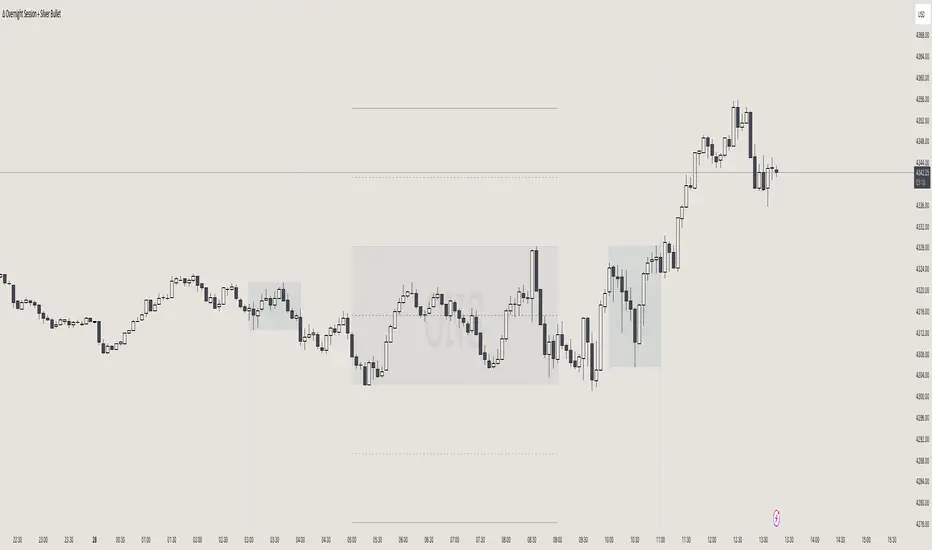
itradesize /\ Overnight Session & Silver BulletOvernight Session & Silver Bullet indicator
The indicator can be divided into two separate stuff:
ONS ( Overnight Session ) based on TCM’s ( TheCurrencyMerchant ) theory and Silver Bullet based on what ICT ( InnerCircleTrader ) is teaching to us.
Overnight Session
• ONS will be always based on Chicago 4am to 8am time according to TCM’s CME teaching.
The indicator has the option to show TSO ( Today’s session only ) which is good to have the chart not messed up by it. At this time when it comes to backtesting just turn this off to have the past ONS and SB ranges showed up on your chart.
• Mid line at the ONS range is useful to have as you are able to decide wether price is in a premium or a discount under the ONS.
If Im a buyer target is above the range, if Im a seller target is below the range.
• You are also able to have SD ( Standard Deviation ) lines for price projections. In the variety of TCM’s videos you are able to have a deeper knowledge.
• You can also extend Today’s ONS lines to the very end of the chart which could make an easier looking on the levels you eyeing with.
Silver Bullet
It’s based on New York time as ICT ( Inner Circle Trader ) is always teaching to us that we should use New York time, every time when it comes to his concepts.
Silver Bullets are always be there aiming of an opposing liquidity pool. They are working even on choppy days.
Silver Bullet hours:
• 03:00 - 04:00am NY Time
• 10:00 - 11:00am NY Time
• 02:00 - 03:00pm NY Time
SB highlighted areas could be shown as a box or a range according to your taste, with or without Start/End lines.
Both of them ca be used to form trades.
You should dig yourself into Silver Bullet ( InnerCircleTrader ) and Overnight Session ( TheCurrencyMerchant ) teachings before the use of the indicator.
Simple setups
• Silver Bullet
Look 20-30 minutes before any SB where the Buy or Sell program has started.
Where the first 1m FVG ( Fair Value Gap ) appears under the range, enter the trade.
Expect only a 5 handle move as a beginner.
1m chart is a must for these kind of FVG entries. ( 30s , 15s can also be used )
• ONS
Price is trading aggressively out of the range to take liquidity.
Once price grabbed liquidity that candle on the 3-5m could considered as on order block for the further movement.
If you are trading in the range, then the opposite side can be the target, if its out of the range and trading one sided, then use standard deviations as 0.5 is a minimum target.
VXD SupercycleVXD is a brand new indicator and still developing. to minimize stop losses and overcome sideways market conditions, Higher Timeframe are recommended
Trend lines
-using Rolling VWAP as trend line to determined if Volume related to a certain price.
-you can switch RVWAP to EMA in the setting
ATR
-trailing 12*ATR and 2.4 Mutiplier
Pivot point and Rejected Block
Pivot show last High and low of a price in past bars
Rejected Block show when that High or Low price are important level to determined if it's Hidden Divergence or Divergence
Symbols on chart show Premium and Discount Prices
X-Cross - show potential reversal trend with weak volume .
O-circle - show potential reversal trend with strong volume .
Setting
Momentum: RSI = 25 , RSI MA = 14
Trend: Rolling VWAP and ATR and Subhag
Trailing STOP: ATR 12 x 2.4
Highlight Bars color when volume is above SMA 6
SMA200 act as TP Line
Risk:Reward Calculation
if Buy your Stoploss will be previous Pivot low
if Sell your Stoploss will be previous Pivot high and will be calculated form there, then show TP in Orange color line
VXD เป็นระบบเทรดที่ผมทดลองเอาหลาย ๆ ไอเดีย ทั้งจาก Youtube facebook และกลุ่มคนต่าง ๆ มารวบรวมไว้ แล้วตกผลึกขึ้นมาเป็นระบบนี้ ใน Timeframe ใหญ่ ๆ สามารถลากได้ทั้ง Cycle กันเลย
Trend lines
-ใช้ Rolling VWAP ของแอพ Tradingview (สามารถตั้งแค่าเป็น EMA ได้)
ATR
-ใช้ค่า ATR 12 Mutiplier 2.4
Pivot point and Rejected Block
Pivot โชว์เส้น High low และมีผลกับออเดอร์ หากแท่งเทียนปิดทะลุเส้นนี้
Rejected Block วาดแนวรับ-ต้าน อัตโนมัติ ใช้ประกอบ RSI ว่ามี Divergence หรือไม่
สัญลักษณ์ต่าง ๆ
X-Cross - แท่งกลืนกิน วอลุ่มน้อย
O-circle - แท่งกลืนกิน มีวอลุ่ม
Setting
Momentum: RSI = 25 , RSI MA = 14
Trend: Rolling VWAP and ATR and Subhag
Trailing STOP: ATR 12 x 2.4
Highlight Bars color when volume is above SMA 6
SMA200 act as TP Line
Risk:Reward Calculation
หาก Buy จุด SL จะอยู่ที่ Pivot low
หาก Sell จุด SL จะอยู่ที่ Pivot high และระบบจะคำนวณจากตรงนั้น จากนั้นแสดงเป็นเส้น TP สีส้ม
This Strategy Combined the following indicators and conditioning by me
ATR , RSI , EMA , SMA
Rolling VWAP - /script/ZU2UUu9T-Rolling-VWAP/
Regression Lines - Subhag form Subhag Ghosh /script/LHHBVpQu-Subhag-Ghosh-Algo-Version-for-banknifty/
Rejection Block , Pivots , High Volume Bars and PPDD form Super OrderBlock / FVG / BoS Tools by makuchaku & eFe /script/aZACDmTC-Super-OrderBlock-FVG-BoS-Tools-by-makuchaku-eFe/
ขอให้รวยครับ.

29 Sniper Execution Window (UTC-5)29 Sniper Execution Window (UTC-5)
This indicator highlights the exact time window I execute my 29 Sniper model — 9:35 to 10:10 New York time.
This is the only period I allow trades.
Liquidity has been engineered, direction is revealed, and higher-timeframe FVG magnets are in play. Anything outside this window is noise.
The shaded session removes hesitation, eliminates FOMO, and keeps execution disciplined and repeatable.
No chasing. No guessing. Just execution when the market is ready.
Rules are simple:
If it sets up in the window, I take it.
If it doesn’t — I do nothing.
This tool exists to protect edge, not create signals.

SMC Structures and FVG RUPTURA & CONTINUACIONIt marks CONTINUATION (BOS) and BREAKOUT (CHOCH) of the trend just like other identical indicators, but with the difference that instead of appearing marked as BOS and CHoCH, here they appear as CONTINUATION and RUPTURA.

Failed 2 StratInspired by Trader Mike, this indicator brings up failed 2 candles, alerting to possible reversals and 1R:1R scalps in the opposite direction. I've been using the m3 9EMA for continuation to push the trade a little further too.
Supported Timeframes Summary
Failed 2 on Opposite FVG on fvg_window) Approx Coverage
M15 M1 25 ~25 min
H1 M5 15 ~75 min
H3 M15 12 ~3 hours
H4 M15 10 ~2.5 hours
H6 M15 8 ~2 hours
D H1 12 ~12 hours

NTrades [ORBDD Advanced]NTrades is a professional Opening Range Breakout (ORB) trading tool designed to identify high-probability intraday breakout opportunities using multi-layer confirmation, smart risk management, and built-in performance analytics.
This indicator is built for traders who want structured ORB execution with institutional-style filters such as trend bias, Fair Value Gap (FVG) confluence, volume confirmation, and dynamic risk controls.


GBPUSD/EURUSD FVG Synchronizationsmt divergence between eurusd and gbpusd. with swing low detection. help traders execute trades with only these pairs

Dual Range Volume Profile█ OVERVIEW
“Dual Range Volume Profile” is a volume analysis indicator that displays two independent volume profiles simultaneously:
- Main Profile – a profile built from the entire visible chart range
- Pivot Profile – a profile calculated from the most recent significant pivot (swing high / swing low)
This allows the trader to see at the same time:
- where the market accumulated volume in the broader structural context,
- and where price equilibrium is forming within the current move.
The indicator draws a volume-by-price histogram, POC, Value Area (VA), and an information table with key levels. It combines macro and micro context in one tool.
█ CONCEPTS
Volume Profile shows at which price levels the highest trading activity occurred — in other words, where the market actually built positions.
Main Profile
This profile is calculated from the entire visible chart range. It provides a broad context:
- historical market balance
- areas of position building
- levels that often act as price magnets
It represents the structural balance of the market.
Pivot Profile
This profile begins at the most recent confirmed pivot (swing high / swing low). It shows the volume distribution inside the current impulse and helps evaluate:
- where new positions are being built
- whether the move is supported by volume
- where a new balance is forming
It represents the context of the current move.
POC – Point of Control
The price level with the highest volume. It often acts as:
- the center of balance
- a price magnet
- a reaction level during retests
Value Area (VA)
The price range where a defined percentage of total volume occurred. VA represents the area of balance between buyers and sellers.
█ FEATURES
- Two volume profiles working simultaneously (global + pivot-based)
- Separate POC for each profile
- Value Area displayed as a box and VA High / VA Low lines
- Configurable VA percentage
- Automatic pivot detection with “Last PH/PL” label
- Volume gradient from low to high
- Full visual customization and an info table with levels
█ HOW TO USE
The Main Profile helps determine where price stands relative to the broader market balance — whether it trades above, inside, or below value.
The Pivot Profile shows how volume is distributed within the current move and whether the impulse is truly supported by market activity. Retests of the pivot POC often behave as local support or resistance.
█ APPLICATIONS
In practice, the indicator is best used for working with price reaction zones and evaluating move quality.
POC and Value Area boundaries often behave like dynamic support and resistance because they represent price levels where the market spent the most activity and participation. After a strong impulse, price frequently returns to the pivot POC or VA boundaries, where the market decides between continuation or a return to balance.
Value Area can also serve a different role — as a compression zone before a move. When price consolidates inside VA for an extended period, the market is in balance. A breakout beyond VA signals a shift from balance to imbalance (volatility expansion). If the breakout is followed by a retest of the VA boundary from the outside, accompanied by increased volume, this often creates an opportunity to enter in the breakout direction.
Particularly strong zones appear when multiple contexts align: Main POC is close to Pivot POC, both Value Areas overlap, and the level coincides with market structure (swings, OB, FVG, higher timeframe levels, etc.). This combination of structure and two layers of volume creates areas with increased probability of price reaction.
The indicator also helps assess move quality — if price moves aggressively but the Pivot Profile does not build meaningful volume, the move may be weak and prone to pullbacks.
█ NOTES
When the chart is heavily zoomed in, both profiles may appear very similar. This can lead to the false conclusion that a zone is exceptionally strong, while it is only the effect of a narrowed data range. Profiles should always be interpreted from a broader perspective, aligned with your trading horizon.
The indicator is not suitable for markets where volume does not reflect real traded activity (e.g., tick volume, synthetic volume, or aggregated data without true liquidity). The quality of volume data directly affects the quality of the levels.
There are also markets where no real volume data exists at all. In such environments, the indicator cannot function properly, as its calculations depend entirely on meaningful volume information.

Precision Entry Systementry system for smc and ict with order blocks and fvgs to make sniper entries and precision and quick execution

FX-CLINIC: Ultimate ICT Toolkit V1FX-CLINIC: Ultimate ICT Toolkit V1
ICT indicator contain multiple tools working powerful together
1- EXTRNAL STRUCTURE:
# Show EMSS,EBOS automatic
# Can control the length of the swing
# Can Change color type of the label and the line
2- INTERNAL STRUCTURE:
# Show IMSS,IBOS automatic
# Can control the length of the swing
# Can Change color type of the label and the line
3- LIQUIDITY LEVELS
# BSL,SSL
# Can control the strong of liquidity from 1-20
# Can Change color type of the label and the line
4- LIQUIDITY SWEEP:
# Can control the strong of liquidity from 1-20
# Can Change color type of the label and the line
5- FVG
# Automatic updated and deleted if break 100% by body candle
# Can Change color type of the label and the line
# Has 50% line and Can Change color type
6- ORDER BLOCK
# Automatic updated and deleted if break 100% by body candle
# Can Change color type of the label and the line
# Has 50% line and Can Change color type

Mine Shaft + Drift + Ore Pocket Detector (Gap+Touch)Mine Shaft + Drift + Ore Pocket Detector (Gap+Touch) — Full Description (v1.6.1, Pine v6)
*Experimental - *Test Phase*
1) What this indicator is intended to do
This indicator attempts to algorithmically discover “mine shaft” price structure on a chart by:
Collecting structural anchor points (gaps and optionally pivots),
Generating candidate trend “rails” (centerline + parallel upper/lower borders) from pairs of anchors,
Fitting an optimal channel width around each candidate centerline,
Scoring candidates based on how well price action conforms to the channel (touches + containment),
Selecting and rendering:
the main shaft channel (primary),
additional drifts (secondary shafts per direction),
And then detecting Ore Pockets: time locations where multiple selected lines intersect (time confluence / intersection clustering).
The conceptual model is:
A shaft = a best-fit channel that price respects over time (the “main tunnel”).
Drifts = alternate channels close in quality to the main shaft (secondary tunnels).
Ore pockets = future/past time coordinates where multiple channels’ centerlines intersect densely (confluence in time, not necessarily in price).
2) What it is doing right now (current behavior)
In its current form, the script does a bounded, performance-limited scan:
It stores a limited number of anchor points in arrays.
It only considers a bounded number of recent anchors per direction.
It constructs candidate lines from anchor pairs and evaluates channel fitness using sampled bars.
On the last bar, it selects top candidates per direction and draws:
a “main” channel per mode (single best overall, or separate up/down),
plus optional drift channels,
plus ore pocket markers.
It is producing meaningful channels and drifts, but it is currently more likely to lock onto a strong “local” shaft than the one macro shaft spanning the entire market structure.
3) Core mechanics (how the script finds shafts)
3.1 Anchor generation (what points it uses)
Anchors are the “support points” used to build candidate shaft centerlines.
Two anchor families are supported:
A) Gap anchors (from your selected gap mode)
These attempt to capture “displacement events” and their boundaries/mids.
B) Pivot anchors (optional structural anchors)
These use pivots to inject macro structure points that are not strictly gap-based.
All anchors are stored as:
anchorX: bar_index of anchor
anchorY: price of anchor
anchorD: direction flag (+1 for up, -1 for down)
Anchors are capped by maxAnchors with FIFO trimming.
3.2 Candidate generation (how it produces centerlines)
For each direction (+1 and -1):
Collect “recent” anchors of that direction within lookbackBars (bounded to maxDirAnchors).
For each pair of anchors (x1,y1) and (x2,y2) that satisfy:
spacing within ,
slope sign consistent with direction,
Construct the line equation:
slope m and intercept b
Fit a channel width w around that line (via width mode).
Score it (touches + inside count minus width penalty).
Keep the top K rails (K = driftCount+1 typically).
3.3 Scoring model (what “best” means right now)
For a candidate centerline:
At sampled bars (stride sampling), compute:
channel top = y(x) + w
channel bot = y(x) - w
Evaluate:
Inside: candle range fits within the channel ± tolerance
Touches: high near top border, low near bottom border (within tolerance)
Score formula:
score = insideCount * insideWeight
+ touchCount * touchWeight
- (w / ATR) * widthPenalty
So:
Higher inside and touch counts increase score
Wider channels are penalized (in ATR units) to avoid “cheating” via enormous width
3.4 Width fitting (how the channel thickness is chosen)
Width is either:
Fit (scan widths): scans widths between a min width and a max deviation cap and selects the best scoring width.
Fixed ATR Envelope: uses a fixed width derived from ATR (currently hard-coded to a 2.0 ATR envelope in your present draft).
Fixed Max Deviation: width is max observed deviation from line in sampled window.
This matters because “macro shaft” detection is strongly influenced by whether the width-fitting is allowed to expand enough to contain large historical moves, without being penalized into losing to a smaller local shaft.
3.5 Rendering (what gets drawn)
For any selected rail, it draws:
Upper border line (top rail)
Lower border line (bottom rail)
Optional centerline (main only)
Optional fill between borders (main only)
Label at current bar with touches and inside count
Drifts render similarly but without main-only features (depending on flags).
3.6 Ore Pocket detection (time confluence)
Ore pockets are not “price zones” directly.
They are computed as follows:
Collect selected centerlines (m,b) for:
the main selected shaft(s),
and all drift centerlines (both directions if present)
For each pair of selected lines, compute intersection x-coordinate:
x* = (b2 - b1) / (m1 - m2)
Only keep intersections within:
Cluster intersections by time proximity (clusterBars)
Mark the strongest clusters (highest counts) as “Ore Pocket” vertical dotted lines with labels.
Interpretation:
A dense cluster indicates many selected rails converge around a similar time coordinate.
It is a “time confluence” hypothesis point.
4) Full settings reference (what each setting is for)
01) Gap Anchors
Gap Mode
FVG (3-candle)
Uses a classic 3-candle fair value gap pattern:
Up gap if low > high
Down gap if high < low
Anchors are derived from the gap boundaries.
Candle Gap (open-close)
Gap based on open vs close of the same bar with a tick threshold.
Candle Gap (open-prev close)
Gap based on open vs close with a tick threshold.
Gap Threshold (ticks)
Only used for the candle gap modes.
Controls the minimum gap size required to register an anchor.
Anchor Price
Boundary: anchors at one gap boundary (more “structural edge”)
Mid: anchors at midpoint of the gap (more “center of displacement”)
Include Pivot Anchors (structure)
When enabled, adds pivots as additional anchors to stabilize macro detection.
Pivot Length
Pivot sensitivity (how many bars left/right define a pivot).
Larger values = fewer, more structural pivots.
02) Channel Fit + Touch Scoring
Lookback Bars
The historical window used to:
filter which anchors are considered “recent enough”
evaluate channel fitness (sampled evaluation)
Larger lookback tends to favor macro shafts, but also increases computational risk (mitigated by evalBars and stride).
ATR Length
ATR period used for tolerance and width penalty scaling.
Tolerance (ATR mult)
Defines how close price must be to a rail to count as “touch” and how strict the “inside channel” containment is.
Higher tolerance = easier to score high on touch/inside.
Min Border Touches (keep rail)
Minimum number of border touches required before a candidate is even eligible.
Score: Inside Weight
Weight of inside count in score.
Score: Border Touch Weight
Weight of border touches in score.
This is a strong driver of “shaft-like” behavior.
Score: Width Penalty (in ATRs)
Penalizes wide channels relative to ATR.
Higher penalty biases toward narrow/local shafts.
03) Performance Controls
Max Stored Anchors (global)
Maximum anchor points kept in memory arrays.
Too low can cause loss of macro structure; too high increases candidate noise.
Max Anchors / Direction (scan)
Hard cap on how many anchors are used in candidate generation per direction.
Critical: this strongly influences whether macro shaft can be found, because if you only keep the most recent anchors, you lose the early-structure anchor points.
Eval Bars (max)
Maximum historical bars actually evaluated for scoring.
Even if lookbackBars is large, evaluation is capped here.
Eval Stride (sample every N bars)
Sampling step for evaluation.
Larger stride = faster but less accurate scoring.
04) Candidate Generation
Min Anchor Spacing (bars)
Minimum distance between the two anchors used to define a candidate line.
Prevents micro-noise lines from being evaluated.
Max Anchor Spacing (bars)
Maximum distance between the two anchors used to define a candidate line.
If this is too low, you cannot generate truly macro candidate lines.
05) Shaft + Drift Display
Main Shaft Mode
Best Overall (Single Shaft): chooses one best rail among Up/Down and draws it as main.
Up Only: show only the best upward rail.
Down Only: show only the best downward rail.
Up + Down: show both main up rail and main down rail simultaneously.
Show Ascending Shaft
Toggles rendering for the “up” main shaft (when mode allows it).
Show Descending Shaft
Toggles rendering for the “down” main shaft (when mode allows it).
Drifts per Direction
Number of additional top-ranked rails to draw per direction (after the best one).
Extend Lines
Right: extend lines to the right only.
Both: extend both left and right.
Fill Main Shaft Channel
Fill between upper and lower borders for main shaft.
Main Shaft Fill Transparency
Transparency level for main fill.
Show Main Shaft Centerline
Draw the dashed centerline for the main shaft.
06) Ore Pocket (Intersection-Time Confluence)
Show Ore Pockets (Time Confluence)
Enables ore pocket discovery and rendering.
Intersection Window Forward (bars)
How far into the future intersections are considered.
Intersection Window Backward (bars)
How far into the past intersections are considered.
Cluster Radius (bars)
How close in time intersections must be to merge into a cluster.
Min Intersections per Cluster
Minimum cluster count required before a pocket is shown.
Max Pocket Markers
Limit how many pocket clusters are drawn.
07) Visual Controls
Show Gap Anchors
Displays the gap anchor dots for debugging.
Show Pivot Anchors
Displays pivot anchor dots for debugging.
5) How to use it (practical workflow)
Step A — Confirm anchor behavior
Turn on Show Gap Anchors.
Choose your Gap Mode.
Verify you are seeing anchors where you expect (displacement boundaries).
If anchors are sparse:
Reduce gap threshold (ticks) for candle-gap modes
Enable pivots to inject structure
Increase lookbackBars and maxAnchors so early anchors are not dropped
Step B — Get stable main shaft candidate discovery
Enable Include Pivot Anchors with a medium pivotLen.
Use Fit (scan widths) initially.
Increase Max Anchors / Direction (scan) so you’re not only using recent anchors.
Increase Max Anchor Spacing so macro pairs are eligible.
If you keep getting only local shafts:
That is usually because the candidate pool does not include enough old anchors, or the maxSpacing prevents long-span lines.
Step C — Tune scoring so the “whole-structure” shaft wins
If the script picks a small local channel instead of the macro channel:
Increase insideWeight relative to touchWeight (macro channels tend to contain longer structure even with fewer perfect “touches”)
Reduce widthPenalty, because macro channels may need to be wider to accommodate historical volatility
Increase lookbackBars and evalBars to make “whole-structure fit” matter
Step D — Drifts as secondary shafts
Once main shaft is good:
Increase Drifts per Direction
Validate that drifts represent meaningful alternate sub-shafts rather than noisy duplicates.
If drifts look too similar:
This is expected if many candidates differ only slightly; future refinements should diversify drift selection (see “what still needs done”).
Step E — Ore pockets interpretation
Ore pockets indicate time confluence of multiple rails.
Use them as:
“Time windows to watch”
Not as deterministic price levels
Tune:
clusterBars (cluster tightness)
minClusterSize (signal strength)
6) What still needs done (explicit backlog)
The macro “main mining shaft channel” spanning the entire market structure, and
Smaller shafts/drifts nested inside the macro structure.
To accomplish that, the current algorithm needs additional architecture. Concretely:
A) True multi-scale / hierarchical discovery (primary missing feature)
Right now: one pass, one lookback, one score objective.
Still Needed:
Macro pass: discover a primary shaft using a very long evaluation window and anchor set.
Micro pass(es): discover drifts/secondary shafts using:
residuals (distance from macro centerline),
or segmented time windows (regime partitions),
or anchor subsets constrained to local regions.
This is the single biggest reason we are not consistently getting the full-structure shaft.
B) Anchor retention strategy for macro detection
Right now:
anchors are FIFO capped and direction scanning uses “recent anchors only.”
To reliably find 10-year shafts we need:
an option to store/retain representative anchors across the entire history, not only the most recent ones.
Examples of necessary improvements:
“Stratified anchor sampling” across time (keep some old anchors even when maxAnchors is hit)
“Macro anchor bank” (separate storage for pivots or major gaps)
C) Candidate generation constraints must support macro lines
If we want a shaft spanning the whole structure:
maxSpacing must allow it
the candidate pool must contain anchors far apart in time
So the algorithm needs:
better selection of anchor pairs for long-span candidates (e.g., include earliest/oldest anchors + newest anchors deliberately, not accidentally)
D) Drift diversification
Right now drifts are “next best by score,” which often yields near-duplicates.
We want:
“diverse” secondary shafts:
enforce minimum angular difference,
enforce minimum offset difference,
or penalize candidates too similar to the already-selected shaft.
E) Width fitting logic for macro channels
Macro channels often require:
either a higher width cap,
or a different penalty profile.
Current width penalty is simple and can bias against macro channels.
Needed:
width penalty that scales by timescale or by total evaluated bars,
or separate macro/micro scoring.
F) Ore pocket semantics enhancement (optional but aligned)
Currently pockets are time intersections only.
If you want “pocket zones,” improvements could include:
projecting intersection price and drawing a zone box,
clustering in (time, price) space instead of only time,
adding “importance” weighting based on which lines intersect (macro line intersections weighted higher).
7) Known limitations (current version)
Heavy compute only runs on last bar (good for performance), but means:
changes in anchors/parameters can reselect rails abruptly
Candidate set is bounded; macro shaft can be missed if not in pool
Drift selection can be redundant
Ore pockets are time clusters, not price clusters

All in One Trend Indicator by Nicks**Multi-Factor Confluence Suite (7-in-1 Overlay)**
### **Description:**
**Overview**
This script is a comprehensive workspace optimizer designed to combine 7 essential trading tools into a single, efficient overlay. By merging trend analysis, market structure, liquidity zones, and momentum signals, this tool allows traders to bypass the standard indicator limit and view high-probability confluence setups without a cluttered chart.
**Key Features & Functionality**
* **Trend Filtering (Hull Suite):**
* A lag-reduced moving average system that visualizes the macro trend.
* Includes candle coloring options to easily identify trend alignment.
* **Market Structure (SMC):**
* Automatically maps Break of Structure (BOS) and Change of Character (CHoCH).
* Identifies Order Blocks and Fair Value Gaps (FVG) for potential entry/exit zones.
* **Liquidity Analysis:**
* **Swings:** Highlights key swing highs and lows where stop losses typically reside.
* **Grabs:** Specifically detects "stop hunts" where price wicks liquidity before reversing (Bubbles visualization).
* **Momentum Signals (UT Bot & MACD):**
* **UT Bot:** Provides high-sensitivity Buy/Sell labels based on ATR trailing stops.
* **MACD Overlay:** Plots signal crossovers directly on the price chart (arrows) to identify momentum shifts without occupying a separate oscillator pane.
* **Session Timing:**
* Visualizes major trading sessions (NY, London, Tokyo, Sydney) with an optional dashboard table.
**How to Use**
This suite is designed for "Confluence Trading."
1. **Identify Trend:** Use the Hull Suite color to determine the directional bias.
2. **Find Structure:** Wait for price to react at an SMC Order Block or Liquidity Zone.
3. **Confirm Entry:** Look for a UT Bot label or MACD Arrow in the direction of the trend.
**Settings**
Each module is separated by headers in the settings menu. You can toggle specific indicators on/off to suit your trading style and keep the chart clean.
**Credits & Attribution**
This script is a compilation of open-source logic from the TradingView community, adapted and updated to Pine Script v5/v6 for compatibility. Special thanks to the original authors for their foundational work:
* *InSilico* (Hull Logic)
* *LuxAlgo* (SMC & Liquidity Swings Logic)
* *Flux Charts* (Liquidity Grabs Logic)
* *QuantNomad* (UT Bot Logic)
* *TraderHariKrishna* (Session Logic)
**License**
This source code is subject to the terms of the Mozilla Public License 2.0 and/or Creative Commons (CC BY-NC-SA 4.0) where applicable by the original authors. This script is intended for educational and personal use.
---

ICT Kill Zones PanelICT Kill Zones Panel - Clean & Simple Trading Sessions Indicator
A simple, objective indicator to identify ICT Kill Zones with real-time status and smart visual highlighting based on New York timezone.
WHAT MAKES IT DIFFERENT:
Traditional indicators clutter charts with dozens of colored boxes from past sessions. This tool provides a clean alternative:
- Real-time information panel showing current active session
- Smart dual-transparency painting: ACTIVE session displays stronger (more visible), historical sessions display softer (less clutter)
- Accurate session timing: Only shows active when session is actually happening
- Mobile-optimized size for phone trading
- Professional interface that doesn't interfere with price action
FEATURES:
- Real-Time Detection: Panel uses actual NYC time (timenow) to show which session is active NOW
- Precise Timing: Sessions activate ONLY during their specific time windows - all zones show inactive outside trading hours
- Smart Visual System: Currently active session has stronger background color, past sessions are softer
- Color Synchronization: Active session color in panel matches chart background color automatically
- Clean Highlighting: Optional background painting with adjustable transparency levels
- Full Customization: 9 panel positions, 4 sizes (Mobile/Small/Normal/Large), fully customizable colors
- All Sessions: Asian (20:00-01:00), London (02:00-05:00), NY AM (08:00-11:00), London Close (10:00-12:00), NY PM (13:00-16:00)
KILL ZONE SCHEDULE (NYC TIME):
1. Asian: 20:00 - 01:00 (5 hours)
2. INACTIVE: 01:00 - 02:00
3. London: 02:00 - 05:00 (3 hours)
4. INACTIVE: 05:00 - 08:00
5. NY AM: 08:00 - 11:00 (3 hours) - overlaps with London Close
6. London Close: 10:00 - 12:00 (2 hours) - overlaps with NY AM
7. INACTIVE: 12:00 - 13:00
8. NY PM: 13:00 - 16:00 (3 hours)
9. INACTIVE: 16:00 - 20:00
During INACTIVE periods, all sessions show as inactive in the panel.
COLOR SYSTEM:
ALL COLORS ARE FULLY CUSTOMIZABLE:
- Each Kill Zone has its own color setting (Asian, London, NY AM, London Close, NY PM)
- Default colors shown in screenshots are just examples
- Active session in panel: displays with its assigned color (e.g., green for NY AM by default)
- Same color appears on chart background with adjustable transparency
- Inactive sessions in panel: display with gray (also customizable)
- Panel background and text colors: fully customizable
- Choose colors that match your chart theme
The green color shown for active sessions in examples is the DEFAULT color for NY AM - you can change it to any color you prefer.
TRANSPARENCY SYSTEM EXPLAINED:
ACTIVE SESSION (happening right now):
- Default 70% transparency = STRONGER/MORE VISIBLE background
- Instantly shows which Kill Zone is unfolding
- Panel row highlights with the session's assigned color
- Chart background displays same color stronger
HISTORICAL SESSIONS (already passed):
- Default 90% transparency = SOFTER/LESS VISIBLE background
- Provides context without visual clutter
- Panel rows show gray (inactive color)
- Both transparency levels fully adjustable in settings
MOBILE OPTIMIZED:
Select "Mobile" panel size for optimal viewing on phone screens - compact layout perfect for smaller displays.
REPAINTING BEHAVIOR:
Panel Status & Colors: Update in real-time as sessions change - panel color switches to match the new active session (intentional for current awareness)
Active Session Highlighting: Adjusts in real-time to show current session stronger on chart
Historical Background Colors: Do NOT repaint - accurately mark when sessions occurred
Session Activation: Sessions activate and deactivate precisely at their scheduled times
CUSTOMIZATION:
- Panel: 9 positions, 4 sizes including Mobile
- Colors: Individual customizable color for each Kill Zone
- Panel Colors: Customizable background, text, and inactive zone colors
- Transparency: Separate controls for active (default 70%) and historical (default 90%) sessions
- Toggle: Show/hide individual zones
- Chart Painting: On/off
HOW TO USE:
1. Add to chart - panel appears top-right
2. Active session displays with its assigned color in panel and stronger on chart
3. Panel shows all zones as inactive during non-trading hours (accurate timing)
4. Panel color automatically changes when new session begins
5. Adjust all colors in settings to match your preferences
6. Adjust transparency settings for optimal visibility
7. Use "Mobile" size for phone trading
BEST FOR:
- ICT traders timing entries during high-liquidity periods
- Smart money concepts (FVG, Order Blocks, Liquidity)
- Traders who want clean charts with essential information
- Traders needing accurate session timing without false signals
- Mobile traders needing compact, clear displays
- Traders who want to customize colors to match their chart theme
TECHNICAL:
- Works on all timeframes
- Built with Pine Script v6
- NYC timezone with automatic DST adjustment
- Precise hour-based session detection
- Lightweight and optimized
- Open source
FEEDBACK WELCOME:
All comments, critiques, and suggestions are welcome! Your input helps improve this tool for the trading community.
Created by ivrank13 for traders who value simplicity, accuracy, and clean charts.
© 2026 ivrank13. All Rights Reserved.
#ICT #KillZones #SmartMoney #ForexSessions #CleanCharts #MobileTrading #CustomColors #AccurateTiming

IBPDA Time Markers Daily OnlyThis indicator plots IBPDA (Interbank Price Delivery Algorithm) time markers based on true bar counts, not calendar days.
Unlike many time-cycle tools that rely on calendar arithmetic, this script calculates 20 / 40 / 60 daily candles, ensuring accuracy across:
market holidays
shortened sessions
exchange-specific trading calendars
It is intentionally restricted to the Daily timeframe, where each bar represents one completed trading session.
🔍 What This Indicator Does
Draws vertical lines at:
−20 / −40 / −60 bars (exact historical daily candles)
+20 / +40 / +60 bars (future projections for planning)
Uses bar index–based logic, not calendar dates
Prevents misuse by enforcing Daily timeframe only
Draws lines once per chart load to avoid clutter and object limits
⚙️ Key Design Choices (Important)
Past markers are exact
Past levels use time , which means “n completed daily sessions ago” — no approximation.
Future markers are projected
Since future bars do not exist yet, forward levels are projected using a configurable day-step. These are meant for time-window awareness, not precision forecasting.
No repainting
All levels are fixed once drawn.
🧠 How to Use (Best Practice)
IBPDA time levels are time magnets, not trade signals.
They work best when combined with:
Higher-timeframe PD arrays (weekly/monthly highs & lows)
Fair Value Gaps (FVGs)
Liquidity pools
Market structure shifts
Watch for price expansion, liquidity events, or displacement occurring near these time markers.
🛑 Limitations (By Design)
Daily timeframe only
Future levels are projections (exchange calendars cannot be predicted perfectly)
This script does not generate buy/sell signals
🎯 Intended Audience
This indicator is designed for:
ICT / SMC traders
Index futures traders (NQ, ES, YM, etc.)
Swing traders and position traders
Traders who respect time as a variable, not just price
🧩 Notes
Best used as a contextual framework, not a standalone strategy
Clean, lightweight, and safe for long-term chart usage
Built with strict Pine Script v5 compatibility and publishing standards

NY PM Session Highlighter (For Hawaiian Traders)Purpose: This script is designed for traders targeting the New York PM Session (1:30 PM – 4:00 PM ET). Based on 5-year historical data for ES and NQ, this window represents a high-probability period for 2:1 Risk-to-Reward setups as institutional traders rebalance and drive price toward the daily close.
Key Features:
DST-Automated Tracking: Uses the America/New_York timezone to ensure the lines stay accurate during Daylight Saving transitions.
Visual Guidance: Draws a dashed vertical line at the 1:30 PM ET start and the 4:00 PM ET close.
Session Boxing: Highlights the background in a soft blue to define the "trading zone," helping you ignore the low-volume "lunch doldrums" that occur immediately before.
Hawaii-Friendly: Automatically adjusts to your local Hawaii Standard Time (HST) so you don't have to calculate the 5 or 6-hour offset manually.
Trade Logic:
Wait for the 1:30 PM ET (8:30 AM HST) line.
Look for a sweep of the 12:00 PM – 1:00 PM (Lunch) range.
Enter on a Market Structure Shift (MSS) or Fair Value Gap (FVG).
Target a 2:1 Reward-to-Risk ratio, aiming to exit by the 4:00 PM ET line.


Gold Professional MacrosMacro Window Descriptions
London Opening Sweep (08:00 – 08:30 CET)
Purpose: The "Judas Swing" window. It captures the initial surge of European liquidity, often creating a false move to sweep Asian Session highs or lows before establishing the true London trend.
London LOD/HOD (09:30 – 10:00 CET)
Purpose: The "Maturity" window. This is where the morning trend often establishes its Low of Day (LOD) or High of Day (HOD) before entering a mid-day consolidation.
Pre-NY News Window (13:30 – 14:00 CET)
Purpose: The "High-Impact" window. Corresponds to 07:30–08:00 NY Time, aligning with major US economic data releases (CPI, Jobless Claims) that trigger immediate repricing in Gold.
NY Open Power Surge (15:15 – 15:45 CET)
Purpose: The "Volatility" window. Marks the official New York open. This is the prime time for ICT Silver Bullet setups as heavy institutional volume enters the market.
The Gold Fix Liquidation (16:00 – 16:30 CET)
Purpose: The Master Macro. This is the London Gold Fix. It is the most critical period for Gold, often resulting in massive reversals or final daily expansions as central banks and bullion dealers settle prices globally.
PM Reversal (19:30 – 20:00 CET)
Purpose: The "Correction" window. Often sees Gold retracing to fill Fair Value Gaps (FVG) or imbalances created during the violent NY morning session.
Key Features of the Script
Visual Time-Boxing: Color-coded background zones for instant recognition.
Automated Labeling: Clearly identifies each macro at the moment of inception.
Multi-Timeframe Compatible: Optimized for M1, M5, and M15 execution charts.
Timezone Synchronized: Hard-coded to Europe/Paris (CET) to align perfectly with European and US market overlaps.

ICT Silver Only Toolkit (XAGUSD) No Baby ICTThis indicator is designed exclusively for Silver (XAGUSD) and applies core ICT concepts to help traders identify high-probability smart-money setups. It automatically plots the Asia session range, London and New York killzones, previous day high/low, equal highs and lows (liquidity pools), Asia liquidity sweeps, and ICT fair value gaps (FVGs).
The toolkit also includes “Do Nothing” warning labels to help traders avoid low-quality conditions such as trading outside killzones, extended pre-NY moves, or impulsive candles. Built for precision and patience, this indicator supports traders who wait for liquidity, displacement, and retracement rather than chasing price.
Best used on 1–15 minute charts during London and New York sessions.
No indicators for bias guessing. No scalping gimmicks. Just clean ICT structure for Silver.

NY Open 60-Min VarBox + Pure ICT FVG V8This is little indicator that shows the NY-Stock Exc. opening candles with a vertical line and a label. It works for different time scales. It also finds the bullish FVGs. It is a good tool for those who follow the opening of the exchange.
